Tuesday, March 31, 2015

Review: How to Create a Mind by Ray Kurzweil

Hello again! Finally I can get back to business now that the Spring musical is over and most of the teachers have recovered from their post-break assignment panic. I read this book a few weeks ago, over my Spring break. It was an interesting book, though very different from Barrat's pessimistic analysis of the state of AI research.


In How to Create a Mind, Kurzweil focuses on trying to predict AI's next step through a mix of neuroscience, mathematical analysis, and philosophy. I picked this book over some of Kurzweil's more famous works, like The Singularity is Near, because I wanted something a little more technical than I assumed those books would be, and I wasn't disappointed.
But the great things about the book are: a) it's easy to read, and b.) fairly well cited. I've seen lots of criticism online about Kurzweil "dumbing down" the theories he talks about in the book, which range from discussions of Hidden Markov Models and the Pattern Recognition Theory of Mind,  to thought experiments like the Chinese Room. I think these critics miss the point of the book - it's not meant to be a textbook. It's meant for the masses, the people looking to understand more about AI and how it works, and in that respect it works very well.

I do have some doubts about Kurzweil's qualifications as a neuroscientist. (Not that I'm any more qualified.) He spends a good portion of the book talking about his Pattern Recognition Theory of Mind (PRTM), where he theorizes that the neocortex of the brain is made up of multi-neuron "pattern-recognizers" that are arranged hierarchally to allow for the recognition of more and more complex patters. Kurzweil does a LOT of guessing in these chapters, from the number of neurons in each pattern recognizers to how they would be structured in the brain, that he almost stipulates as fact. His explanation of the theory is convincing, at least to someone like me; Plus the inspiration has created several useful AI tools, such as the Hidden Markov Model and Hidden Temporal Model. But I'd have to do more of my own research to say anything substantial about the validity of the theory.
Kurzweil's thoughts on consciousness and the mind, the focus of the second half of the book, match up pretty well with my own, and I enjoyed reading his justifications for them. They make for good argument fodder, and, as I'm sure you know, argue I do. And more than anything else, this second half is a place of argument: Kurzweil goes out of his way to defend his predictions and disprove his detractors and their positions. In some cases it seems almost a little desperate, and one chapter late in the book becomes quite tedious as Kurzweil tries to defend his Singulatarian movement (On which my views haven't changed. See my review of Barrat's Our Final Invention).


But you shouldn't let this criticism stop you from checking out the book. It tends toward overstatement and futuristic optimism, but, so does Kurzweil. The information is well cited, inspiring, interesting, and a great base for further research. I would wholeheartedly recommend the book to anyone interested in AI - So long as they know nothing there, or anywhere else, is the final word.


Wednesday, February 25, 2015

AI and Tic-Tac-Toe -

If you've seen any of my posts in the past, you know about my clearly negligible interest in artificial intelligence. I also mentioned in my review of James Barrat's Our Final Invention that I wanted to take the next step, and bought myself an Artificial Intelligence Textbook at Half Price Books (this one, to be exact, although only the 2nd edition.) I'll be short about it - SO. COOL. I've talked my family's ears off about every chapter so far, which is about a third of the way through. However,  I have one major complaint about the textbook - it doesn't feature any actual programming exercises. It refers to possible problems to solve - games, like chess; mathematics problems and solving theorems; P vs NP problems; but the book doesn't offer any exercises that let you try out the methods for solving them in real time. And for me, that just isn't good enough.

So, I decided to take matters into my own hands, and try out the first problem mentioned by the book: Tic -Tac-Toe.

WARNING: THE FOLLOWING SECTION IS EDUCATIONAL, BUT ALSO REALLY LONG
SKIP TO THE PROGRAM PICTURES IF YOU JUST WANT TO HEAR ABOUT MY SOLUTION

The book uses Tic-Tac-Toe to introduce the concept of a heuristic search. A heuristic is a way of gauging whether or not a potential solution to a problem is a good one. For example, if you were trying to walk downtown in a foreign city, a good heuristic would be to take a path that goes toward the tall buildings. This might not always be a perfect method(some cities are more labyrinthian than others), but it will usually do a good job of finding a solution for your problem. Our thinking is completely tied up in heuristics - they're the rules you make up about how you run your life, whether it's how much money you save each month, or the lucky socks you wear to every test.

In the context of Artificial Intelligence, a heuristic search is one way a program can do its thinking.
Let's look at this in terms of Tic-Tac-Toe
The program looks at a problem as a series of states. These are possible states of a Tic-Tac-Toe problem.

Pretty simple, right? You can perform an action on a state to change it to another state - like making a move on the board. Now a solution to this particular type of problem is a progression of actions and states that ends in the program either getting a three-in-a-row, or tying with the opposite player - a "winning" state.

In order to find a solution, the program takes a state, performs an action on it to create a new state, and checks if it's a winning state. If it is, it returns the action it took. Otherwise, it tries a different action.

The most basic kind of thinking is trial-and-error. You generate a random possible action to solve a problem, and if it doesn't work, discard it and try another. This WILL get you a good solution... eventually. For small problems, this might not be an issue. But for big problems with millions upon billions of possible solutions, there's no way.


This is where the heuristic part comes in. I find it useful to imagine an AI as on a map, starting on a base state, with paths to every other possible state representing every possible action it could take. When the AI tries an action, it moves along the path to the new state, which has paths connecting to all of IT'S possible states, and so forth. And every state has an elevation - the higher up it is, the better is fits a heuristic (with the highest being winning states, of course). Your AI's goal then is to find the action from the state it's at that will get it to a higher state (one that better fits the heuristic).  This means a lot of heuristic search techniques have funny names like Hill Climbing. The program's  ultimate goal is to get to higher (or highest, when possible.) ground.

For example, your Tic-Tac-Toe playing program (assuming computer plays X) might decide that a good state is one that has the most possible, shortest paths to a winning state for X, or, in other words, the most rows, columns, and diagonals with only Xs in them. From a base state, a program with this heuristic will make a move in the middle space as it's action, because the state created is the "highest" state - it gives you 4 possible ways to win. It's the best possible action.

At this point it's important to note, however, that finding a best possible action isn't always possible - for problems where you can take a lot of different actions, it might take too much time. For problems where states can be far away from the winning state, you can get stuck on a 'ridge' or a 'plateau' where you've found the best possible state for your local area, but there's one much better many, many actions away. This is the reason heuristic search algorithms can get so complicated, and why so many different ones exist. AI's greatest achievement and it's greatest challenge is dealing with situations where 'best' isn't possible.

However, Tic-Tac-Toe is a relatively simple problem - one small enough that it COULD be solved through trial and error, we just want it to be solved faster. For my programs, I decided to combine two different heuristic techniques - Steep Ascent Hill Climbing and Minimaxing.

Steep Ascent Hill Climbing is a heuristic search method where you evaluate all the possible states you could reach from your given state and pick the best one. Because of this, it can take longer for your computer to complete than plain old vanilla hill climbing, which just finds any state that's better than the current one. But it will typically take fewer steps to get to a winning state, and, in the case of a game like Tic-Tac-Toe, a 'good' move really isn't good enough.


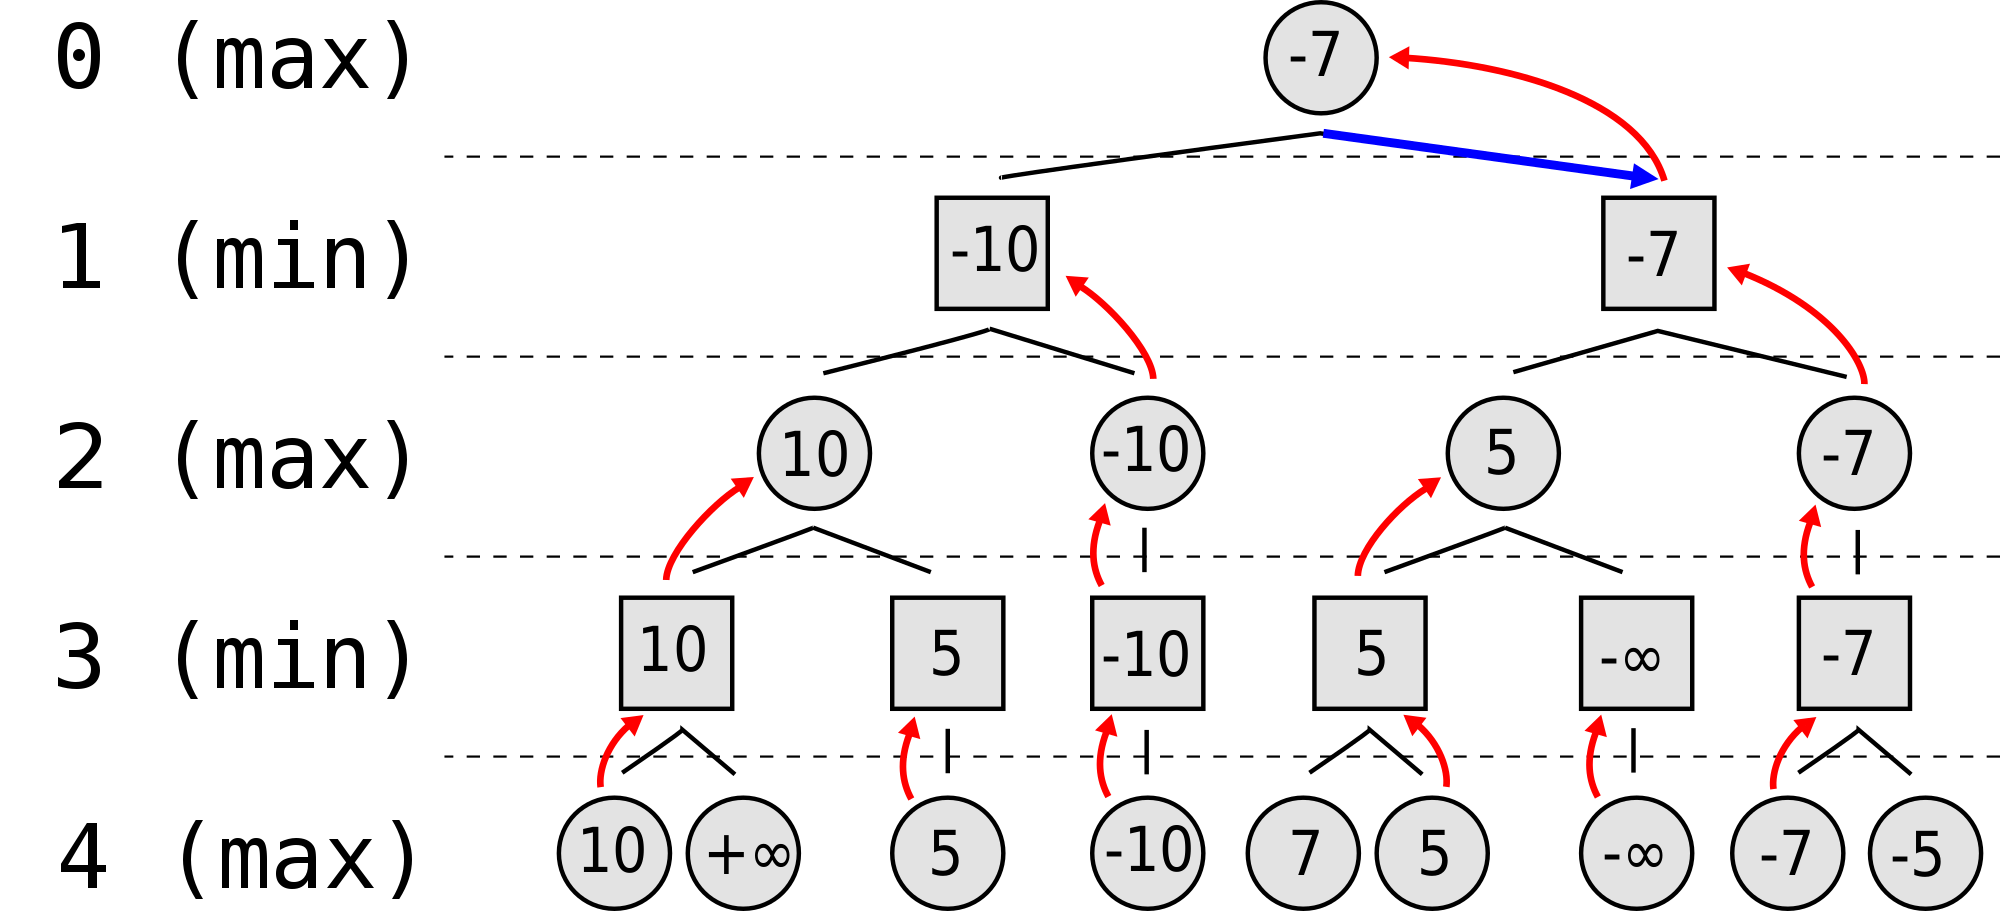
Minimaxing is a a method more specific to game theory. You assume that, for every move each player makes, they are going to try and maximize their own gains and minimize their own losses - while maximizing the losses and minimizing the gains for the opposing player. In true minimaxing, you estimate the number of moves it will take for you to win the game from a given state, and use that to assign the state a score. I combined this approach with a different heuristic to make my program as fast and effective as I could


 I actually built the first two iterations of this program back in mid-October, but I was then hit in quick succession with the Girl Scout National Convention and GSLI conference, my Gold Award Project, make-up work, then school, and it's just been crazy ever since.

The first draft took about a week to build.  I coded everything in Ruby.


Basically, the computer takes the tic tac toe board, uses is to test all the possible moves it can make, and picks the one that gets it the highest score. 

It played Tic Tac Toe, for sure! It just... didn't play very WELL. I used a heuristic that scored the board on the number of open rows, columns, and diagonals, but it just didn't give the weight needed to winning states. So I tried again.

I found a promising looking heuristic here. This one made use of an array to store all the possible ways to win, and another to score the state based on how many ways X and O can win on the board. But even better, I gave the computer the ability to look one move further ahead, and try to guess how the opponent would respond to its move.  This was minimaxing - the computer assumed the opposing player would play their best, and could then use its move to put the opponent in the worst possible position.

This program worked GREAT! It was almost unbeatable!

But, it had one weakness.


It could only look two moves ahead, and beating THIS trap required the program to look ahead 4.

In the end, I found it was easier to adjust my heuristic than to double up on the moves my program watched. I made sure it treated getting these traps - the three corners, or this triangle - as winning when scoring the boards, but NOT when checking for a win. In this way, the program finally worked.


Next, I'm working on trying to make a program that can learn the game on it's own from repeated trials - but that's a whole other ball game. For now, I'm just happy with how my first foray into AI programming worked out!

If you have questions/or comments don't hesitate to ask! I'm always happy for feedback.

Tuesday, February 24, 2015

Makerspace: Chugging along!

Sorry for the dearth of posts! It's been a rough couple of weeks here, what with school, theatre, and even a coding competition (2nd place!), and the NCWIT Aspirations in Computing Affiliate Award Ceremony!

But mostly, I've been slowly pushing forward with my Gold Award project.
I've held 4 meetings so far this semester. I try to start each one with some kind of a question. For example, a the first meeting I asked what each student thought technology was, and what it was used for. ( I keep the questions open ended, so I sometimes get some... interesting answers.) Then I introduce an activity, and the rest of the meeting is devoted to that activity.

 The first one focused on the engineering design process. I built a ramp at home out of old K'Nex kits, and had students divide into groups to try and design a Lego car that could jump off the ramp from one desk to another. The group work turned out well - it's definitely something I'll continue. The kids really enjoyed the chance to talk more while they worked. Later meetings have been about programming, and more recently, robotics and game design.

The club is also making use of a Google Classroom to keep in touch outside of class. I like the Google Classroom setup, although I find myself wishing it was a little less of a bare-bones framework. I'd appreciate an easier calendar application, intersectionality with google hangouts, etc.

Finally, I was pointed by my sponsor to an assistant principle at my school who was interested in creating a Girls Who Code club at the school. This kind of thing requires a higher-up approval where I live, so it probably won't get started until next year, but it's a step toward getting a wider recognition of what I'm trying to do, and I'm excited to help.

Anyway, this is what the space looks like right now:

The new boxes and ramps are from some of the previous projects.


Slowly but surely, we're getting there!

Coming soon: I PROMISE I will finish my post on my Tic Tac Toe program soon - every time I start writing about it, I end up working on improving it again. Then I've got another book review from the opposite end of the AI spectrum - Ray Kurzweil's "How to Create a Mind." So stay tuned!

Sunday, January 11, 2015

Simple Circuitry Projects: Make a Lightbulb Necklace!

Note: This is a more seasonally appropriate version of my  Holiday Bauble Project - both projects can be made from the same parts, and are put together in a similar way, and are great as a first project for individuals or groups interested in circuitry!


Here's what you'll need: 

1 Miniature Glass Ornament
Some silver ribbon (I used Easter Basket filling)
2 Pieces of Wire
1 Lithium Coin Battery

1 LED

A hot glue gun
A pencil
Some tape (electrical tape works best)
Scissors


How to make your ornament:
Carefully pull the silver top off the glass ornament, then pull the pin out.


Use a pencil to push the silver ribbon into the ornament.
Put a piece of tape on the inside of the silver ornament top so that it covers the two holes. Poke one of the leads of the LED through the tape and through the hole so that the bulb is UNDER the ornament top.


Use the hot glue gun to secure the LED to underside of the lid so that the bulb sticks out by about half an inch. 


Then glue the lid back to the top of the ornament so that the edge of the lid touches the top of the glass neck of the ornament, and wrap both in your choice of duct tape. 


Make sure to test it! If the LED doesn't light, it could mean that you need to wiggle the leads so they aren't touching the lid of the ornament. 


Loop one of the metal ends of the black wire around the shorter lead on the LED, and secure it with hot glue or tape.  Make sure the wire is directly touching the lead! Then, do the same with the red wire on the longer lead.

If you're interested in doing the experiments (which require 2 or more baubles), here are the instructions I'm giving out with the kit below:

PARALLEL AND SERIES CIRCUIT EXPERIMENT


Series circuits are created by wiring all the components of a circuit in a line. The electricity moves straight from one component to the next. They’re useful when you want a circuit to shut down completely if it’s damaged. 

Just connect the wires red to black for series, and make sure the red wire goes to the positive side of  the battery, and the black to the negative. 

What happens when you add more ornaments to the chain? Try touching a paperclip to both leads of an LED in the circuit. What happens? Why is this? 


Parallel Circuits are created when each component gets its energy directly from the same energy source. They’re useful when you want each component to work independently of each other, or if you don’t want damage to one component to affect the others. 

For a Parallel circuit, the black or red wires for each ornament connect with the black or red wire leads of the next LED. The last black wire in the chain goes to the negative side of the battery, the last red wire to the positive. 

What happens when you add more ornaments to this chain? Try touching a paperclip to both leads of an LED in the circuit. What happens? Why is this? 


Finally, to finalize the lightbulb, tape the other end of the red wire to the positive side of the battery, and the black wire to the negative. The LED should light up. If it doesn’t try swapping the wires or moving the LED’s leads. If they’re in contact with the metal of the ornament top, the LED won’t light.

Now you can use your lightbulb as an ornament, a necklace, or whatever strikes your mood! And don't be afraid to personalize it with further decoration.

And if you happen to make one, please, send me a picture at rach.s.thompson@gmail.com. I'd love to see it!

Monday, January 5, 2015

More Web Design: Learning Rails Online

So, if you haven't seen my other post, as a part of the application process for a more advanced Tech Theatre class in 11th grade, I need to have a digital portfolio.*

Now technically I could just have my every project hard-coded into each page using html and CSS, but that sets off every alarm bell I've got. It's just bad code. I don't want to have to type all that out over and over again! It would be much easier if I could create and projects without having to program each one in individually.  So, I visited my good friend Codecademy again to take a crack at one of their newer, longer, tutorials: Ruby on Rails.


* I have since been informed that a powerpoint would have been fine, but where's the fun in that?

I picked Rails over PHP or the other options because I've had more experience coding in Ruby than any other language (except possibly Java, through iTunes U's Stanford CS101 course, but that was a while ago). I wanted at least some sort of base to start from because, and let me make this very clear: I had no clue what I was doing. I'd never done any sort of web applications before. I'd never done any programming projects where I had to juggle multiple files or languages. So I figured if I was going to take my trial by fire, I might as well wear some sturdy shoes.

I installed Rails through Homebrew (a package manager that mimics linux) for my mac. All the files I  created defaulted into Xcode and not Textmate, which surprised me, and then I used Brackets to edit my views and stylesheets.

So like this, but with at least seven more windows open, and a cat lying on the keyboard.


The rails tutorial has a very, VERY slow start, especially if you already know how to code in Ruby. It's essentially a Ruby and a Rails intro all in one, and I couldn't find any way to skip. Prepare to spend a good hour on 'hello world!' type lessons before getting to the good stuff. And the good stuff is good, but I had one major problem through the tutorial - some of the code doesn't translate well to building your own app because it leaves out bits to simplify the tutorial.  Which meant I saw an awful lot of this:

Add your own hair pulling and incomprehensible screeching.

And don't get me started on associations. For the basic structure of my web app, I want each project to belong to a category, and each picture to belong to a project. It turns out that Codecademy's take on explaining how to create these associations... assumes a lot, in the best of cases. In the worst, trying to replicate the code structure just doesn't work because they leave pieces out.

Sometimes though, it's your own fault and you know it.

So, I supplemented my learning with this Rails Guide. The great thing about this guide is that it can act as a sort of cheat sheet. Every time I looked at something in the codecademy tutorial  and had no clue what was going on, I could look back to this page, and find the no-fluff method to getting done what I want to do. In my opinion, it does a much better job of explaining the structure of Rails than Codecademy. But the benefit of Codecademy is being able to type in the code for yourself and see the different files side by side in the simulator. For better or for worse, I really needed both.


Of course, neither of these things stopped me from spending hours on stackoverflow because my CSS wasn't updating as I refreshed the page, or my migration wasn't taking, or every single one of my pictures was apparently owned by every single one of my projects. That's just part of the learning process: you can't really, truly learn a programming language until you start to program something in it.

So now my website is finally coming together functionally!


CSS could still use some work though.

 I've started to look at options for hosting. I'm going to try out Heroku, because it's free to start out, and I've heard good things about it so far. Any thoughts or suggestions? Questions about the tutorials, or where to learn more? Ask away!


Tuesday, December 16, 2014

Teaching Basic Circuitry the Holiday Way!

If you've seen my last post here, you've probably seen this little bauble.


This is the final product created by the no-solder kit I'm selling to fund my Gold Award project. The idea is that the kit is easy to assemble as a kit to teach younger kids about Parallel and Series Circuits, while still leaving something cool for them to take home. Each bauble costs less than a dollar to make*, and all the materials can be bought with a trip to a craft store and an electronics store, so I'd say it's pretty successful!

*If you buy batteries online, as most coin batteries I've seen are insanely expensive at grocery stores. I bought 100 for $17 from this website.

Here's what you'll need: 

1 Miniature Glass Ornament
Some silver ribbon (I used Easter Basket filling)
2 Pieces of Wire
1 Lithium Coin Battery

1 LED

A hot glue gun
A pencil
Some tape (electrical tape works best)
Scissors

How to make your ornament:
Carefully pull the silver top off the glass ornament, then pull the pin out.


Use a pencil to push the silver ribbon into the ornament.
Put a piece of tape on the inside of the silver ornament top so that it covers the two holes. Poke one of the leads of the LED through the tape and through the hole so that the bulb is UNDER the ornament top.


Use the hot glue gun to secure the LED to underside of the lid so that the bulb sticks out by about half an inch. 


Then glue the lid back to the top of the ornament so that the LED is hidden by the silver ribbons


Loop one of the metal ends of the black wire around the shorter lead on the LED, and secure it with hot glue or tape.  Make sure the wire is directly touching the lead! Then, do the same with the red wire on the longer lead.

If you're interested in doing the experiments (which require 2 or more baubles), here are the instructions I'm giving out with the kit below:

PARALLEL AND SERIES CIRCUIT EXPERIMENT


Series circuits are created by wiring all the components of a circuit in a line. The electricity moves straight from one component to the next. They’re useful when you want a circuit to shut down completely if it’s damaged. 

Just connect the wires red to black for series, and make sure the red wire goes to the positive side of  the battery, and the black to the negative. 

What happens when you add more ornaments to the chain? Try touching a paperclip to both leads of an LED in the circuit. What happens? Why is this? 


Parallel Circuits are created when each component gets its energy directly from the same energy source. They’re useful when you want each component to work independently of each other, or if you don’t want damage to one component to affect the others. 


For a Parallel circuit, the black or red wires for each ornament connect with the black or red wire leads of the next LED. The last black wire in the chain goes to the negative side of the battery, the last red wire to the positive. 

What happens when you add more ornaments to this chain? Try touching a paperclip to both leads of an LED in the circuit. What happens? Why is this? 


Finally, to finalize the ornament, tape the other end of the red wire to the positive side of the battery, and the black wire to the negative. The LED should light up. If it doesn’t try swapping the wires or moving the LED’s leads. If they’re in contact with the metal of the ornament top, the LED won’t light.

I hope this lifts your holiday spirits! It's fairly durable (I was able to wear one on a necklace all day at school with minimal problems.) and it looks good. Try it as an ornament, a necklace, and augmentation to an ugly sweater, or just a shiny reminder to say "Happy Holidays!" 

And if you happen to make one, please, send me a picture at rach.s.thompson@gmail.com. I'd love to see it!

Friday, December 12, 2014

Makerspace, Part 2: The Plan.

Last week, I finally got to have my first meeting with the middle school Technology club I'm working with to create the Makerspace. We talked about what a Makerspace was, how we were planning to use it in the school, and the various bits and pieces of old projects that I brought to show what kinds of things could be made in a Makerspace. Basically, it was a condensed version of this post, with a few pictures from Big Hero 6 and Iron Man 3 as reference points.

Good movie...  but it was no Wreck-it-Ralph. 

At the end of the meeting, I had ever student write down on their slip of paper the top ten things they wanted to be able to make/learn in the technology club. Over the weekend, I looked through all the answers I got, and came up with the five main units that would be the most useful and interesting to kick off the Makerspace and the Tech Club. The Technology club has two types of meetings - "Class" meetings, which teach skills like the one's seen below, and "Business" meetings, where we'd focus more on the Makerspace itself, and where members would have time to share the projects they've been working on (THAT is for a different post). But the introductory skills are important for the students with little or no experience. So here's what I've put together: 


1. Programming
 This is the obvious one, but I've put it as the first unit because it's a vital skill so many of the other projects the students were interested in, and because it doesn't require expensive materials. I'm working on lesson plans for a programming intro class for Scratch, which will hopefully give enough of an introduction that the students will feel comfortable working on Codecademy tutorials or learning from other online resources


2. Robotics
These kids love robotics almost as much as I do. The issue here is limited time and materials. I'm planning on doing two classes with Mindstorms Ev3 - one for building, one for programming. I'd also like to incorporate robotics into an Arduino introduction later on - I have an RC car that I robotized with an Arduino that would make a good example.


3. Circuitry
While I'd actually prefer this unit before robotics, the littleBits are one of the more expensive items in the budget, and, while I have an Ev3 kit at home that I could bring as an example, the same isn't true here.


4. Computers
This is kind of a catch-all unit. Here I definitely want to have a class on the Raspberry Pi, but I also want to bring in some of the other Technology Club Alumni to teach classes on things I'm not as familiar with, like App programming and Web Design. (It's interesting to see how our individual interests were foreshadowed through Tech Club and the technology class. The ones who spent all their time on the iPod touches now program them, the ones who spent all their time tweaking Powerpoints and Tshirt designs have gone into 3D animation or computer graphic design. And yours truly MAY have turned in a final paper analyzing potential uses for robots that could create their own languages after researching this. I really should post it here if I can find it.)


5. 3D Printing
I have never had the opportunity to use a 3D printer, and I could not be more excited to learn. That's why this unit is last - I know the least about it, and I need that time to learn. I'm planning on getting the Printrbot kit, and using Google Sketchup and Autodesk inventor to do the modeling, since our school system already has that software.


These are the things we decided would be the most useful. I've said before that you don't need expensive tools to make a Makerspace, and I stand by that statement. But good tools make making more accessible, and especially in a school setting, that's important. And tools cost money.
About $1,300 worth of money, not counting shipping or storage.

I'm looking at a couple different ways of doing money-earning.  For the more expensive kits, I've talked to my sponsor about using DonorsChoose. It seems like a great program, and I'd appreciate the help in offsetting the cost. However, with finals rapidly approaching, we haven't had the chance to talk to the school administration yet. So I've started with some simpler money-earning opportunities. Right now, I'm creating kits for making small light up ornaments to teach younger kids about the basics of circuitry. The kits would also be good for making a string of lights, good for teaching Parallel vs. Series. Plus, who doesn't love holiday themed illumination? Here's a picture of the prototype. I'll be posting a tutorial soon.


I'm selling the kits to local scout troops as an end of year craft project and my goal is to raise about $100 to start off with.

And finally, while I can't expect to rely on donations, I had the opportunity over Thanksgiving break to collect some of my great-grandfather's old tools for use in the Makerspace, which I cleaned up and labeled.


It wasn't anything too fancy - just screwdrivers, wrenches, a level, things that would be useful for building or disassembling small projects. But that toolbox has officially become the first thing in the Makerspace.


It's a long road ahead, but we have a plan. Let the making commence!

PS: One last thing. One of our main concerns with the technology club is the participation of girls. I was one of two girls out of about fifteen people at the clubs inception, a ratio that improved a little  the next year, I suspect because both of us were so active in the club. Now, she's actually come back to help with my project. But we still see the same problem. There were only two girls at the meeting and about twenty boys. Do any of you have suggestions for getting more girls involved?