Showing posts with label Programming. Show all posts

Thursday, April 16, 2015

The Importance of the Humanities in STEM

Let's start with an easy opinion to swallow:  The US has a problem with its STEM education. But not in the way you might think. The trouble with STEM in the US isn't that we rank low worldwide in math, or in science. It's that the money going toward improving those test scores is too often taken from the arts. And it shouldn't be. That might sound odd coming from me - the organizer of a STEM program that serves 50+ kids, as well as an engineer and programmer - but hear me out. It's not that I think STEM education is useless, or that we need to take resources away from science and technology classes. But too many schools teach STEM materials poorly, and at a much bigger cost than they realize.

In the digital age, we're hyperfocused on teaching math and science to "catch up" to countries like China and India in terms of scores on international exams. This emphasis on test scores has increased funding for STEM programs - great! Student interest can flourish. Teachers can get new technology for their classrooms. And where the funding is used to improve test scores, they improve. It's a win/win deal.   But that funding has to come from somewhere, and often it comes from budget cuts in the liberal arts and humanities. That is very, very bad.

Note: Not how the brain works. 

We seem to have this idea that STEM and the arts are two immutably separate entities. Just ask an engineering major what they think of the liberal arts at their university, or vice versa. It follows that they have to be in constant competition - one has to be more important. You can't have both science AND religion. You can't love both math AND painting. Maybe such a divide meant more when technology was factory machines and assembly lines, but the way we use technology has changed immensely even in the past few years. Supporters of STEM education often remind us that, in the future, every job from will require some knowledge of technology. But the reverse is also true: every worker in a STEM related field would benefit from the kind of education that comes with the arts. 

There's so much more to building, programming, and selling a computer than hardware specifications. A computer has to be used by humans, humans that bring their own aesthetic preferences, learning curves, and emotional pulls to the table. All of that has to be designed into the machine, and there's more to it than statistics. There's some psychology, some visual arts, maybe even some music or some writing. Computers are sold as lifestyles, not machines. And that' s not even counting the interpersonal skills the production team had to use to brainstorm, or the dozens of concept sketches and pitches created before the final design was chosen.  There's a creativity needed to get ahead in technology, and it doesn't come from the  skill set that makes kids better at taking math tests. But somehow, although the need for the humanities in technology becomes more prevalent every day, we've been devaluing the classes and the skills they give us. What can we gain from the humanities in STEM? And how can we make sure those skills aren't left out?



The best STEM class I ever took was a technology class taught by a middle school librarian. (I've mentioned it before, here.) She started the school's technology club the first year I attended - I was one of the founding members. In the club, we tried to finagle our favorite technologies into different parts of the school and curriculum. We taught the English and Social Studies teacher how to make Google Earth tours. We made videos for new students using editing programs and green screens. One member even designed a new website for the school. By the next year, the club has become a class, and one that was unique in two ways. One, we were working with people outside of the class and our experience with technology. Anything we created had to be presented in a way that was easy for anyone to understand and use. Two, our projects were working to solve real world problems, problems that required skills beyond just our programming expertise. 

So we wrote tutorials. We created animated sequences and music for the videos. We read books and drew pictures and argued over the latest technology news. We were able to use the skills we learned in our English, History, Art, and Music classes to augment our projects in the class. While I know the class wouldn't have worked for everyone,  many of the later engineering and science classes I took only focused on teaching the minimal technological  skills necessary for a basic concept. That's fine for a technology class. But those are skills you have to get somewhere. This only emphasizes the importance of Humanities focused classes in all student's education. Those classes are where students gain the skills needed to turn technology into real world solutions for real world people.

As I mentioned before, this is more important today than ever. Take a minute to watch these commercials :


Notice anything about these advertisements? They aren't selling their products based on how many processors they have, or how many transistors they can fit on a chip. They sell computers based on how people use them. And computers are used for so much more than pedigree STEM purposes. You need artists who can create programs for artists. You need historians. You need musicians. If for no other reason, you need art educated people to create the media you enjoy so much today. Every TV show, game, article and more you find online comes from arts education every bit as much as STEM.  Who'd want to live in a world without the art we love? How could we move forward without the art that has inspired us to create new things?

We play a dangerous game by ascribing innovation to the kinds of skills that can be measured by standardized tests. Support your local arts and humanities programs. Bring art into your STEM classes, and STEM into your art classes. Read, watch, create, and enjoy how the world you live in hasn't been created by opposing forces, but a beautiful mixture of every skill humanity has to offer. Push for access to education in each and every one. We've got to create a future that's worth the time we put into it. 


Wednesday, February 25, 2015

AI and Tic-Tac-Toe -

If you've seen any of my posts in the past, you know about my clearly negligible interest in artificial intelligence. I also mentioned in my review of James Barrat's Our Final Invention that I wanted to take the next step, and bought myself an Artificial Intelligence Textbook at Half Price Books (this one, to be exact, although only the 2nd edition.) I'll be short about it - SO. COOL. I've talked my family's ears off about every chapter so far, which is about a third of the way through. However,  I have one major complaint about the textbook - it doesn't feature any actual programming exercises. It refers to possible problems to solve - games, like chess; mathematics problems and solving theorems; P vs NP problems; but the book doesn't offer any exercises that let you try out the methods for solving them in real time. And for me, that just isn't good enough.

So, I decided to take matters into my own hands, and try out the first problem mentioned by the book: Tic -Tac-Toe.

WARNING: THE FOLLOWING SECTION IS EDUCATIONAL, BUT ALSO REALLY LONG
SKIP TO THE PROGRAM PICTURES IF YOU JUST WANT TO HEAR ABOUT MY SOLUTION

The book uses Tic-Tac-Toe to introduce the concept of a heuristic search. A heuristic is a way of gauging whether or not a potential solution to a problem is a good one. For example, if you were trying to walk downtown in a foreign city, a good heuristic would be to take a path that goes toward the tall buildings. This might not always be a perfect method(some cities are more labyrinthian than others), but it will usually do a good job of finding a solution for your problem. Our thinking is completely tied up in heuristics - they're the rules you make up about how you run your life, whether it's how much money you save each month, or the lucky socks you wear to every test.

In the context of Artificial Intelligence, a heuristic search is one way a program can do its thinking.
Let's look at this in terms of Tic-Tac-Toe
The program looks at a problem as a series of states. These are possible states of a Tic-Tac-Toe problem.

Pretty simple, right? You can perform an action on a state to change it to another state - like making a move on the board. Now a solution to this particular type of problem is a progression of actions and states that ends in the program either getting a three-in-a-row, or tying with the opposite player - a "winning" state.

In order to find a solution, the program takes a state, performs an action on it to create a new state, and checks if it's a winning state. If it is, it returns the action it took. Otherwise, it tries a different action.

The most basic kind of thinking is trial-and-error. You generate a random possible action to solve a problem, and if it doesn't work, discard it and try another. This WILL get you a good solution... eventually. For small problems, this might not be an issue. But for big problems with millions upon billions of possible solutions, there's no way.


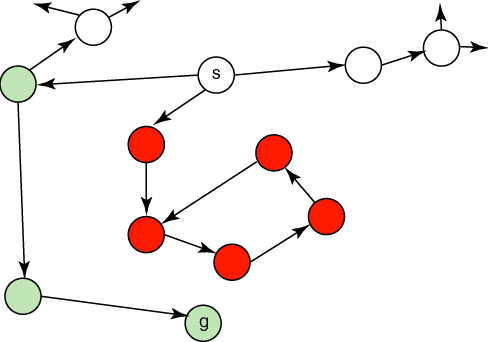
This is where the heuristic part comes in. I find it useful to imagine an AI as on a map, starting on a base state, with paths to every other possible state representing every possible action it could take. When the AI tries an action, it moves along the path to the new state, which has paths connecting to all of IT'S possible states, and so forth. And every state has an elevation - the higher up it is, the better is fits a heuristic (with the highest being winning states, of course). Your AI's goal then is to find the action from the state it's at that will get it to a higher state (one that better fits the heuristic).  This means a lot of heuristic search techniques have funny names like Hill Climbing. The program's  ultimate goal is to get to higher (or highest, when possible.) ground.

For example, your Tic-Tac-Toe playing program (assuming computer plays X) might decide that a good state is one that has the most possible, shortest paths to a winning state for X, or, in other words, the most rows, columns, and diagonals with only Xs in them. From a base state, a program with this heuristic will make a move in the middle space as it's action, because the state created is the "highest" state - it gives you 4 possible ways to win. It's the best possible action.

At this point it's important to note, however, that finding a best possible action isn't always possible - for problems where you can take a lot of different actions, it might take too much time. For problems where states can be far away from the winning state, you can get stuck on a 'ridge' or a 'plateau' where you've found the best possible state for your local area, but there's one much better many, many actions away. This is the reason heuristic search algorithms can get so complicated, and why so many different ones exist. AI's greatest achievement and it's greatest challenge is dealing with situations where 'best' isn't possible.

However, Tic-Tac-Toe is a relatively simple problem - one small enough that it COULD be solved through trial and error, we just want it to be solved faster. For my programs, I decided to combine two different heuristic techniques - Steep Ascent Hill Climbing and Minimaxing.

Steep Ascent Hill Climbing is a heuristic search method where you evaluate all the possible states you could reach from your given state and pick the best one. Because of this, it can take longer for your computer to complete than plain old vanilla hill climbing, which just finds any state that's better than the current one. But it will typically take fewer steps to get to a winning state, and, in the case of a game like Tic-Tac-Toe, a 'good' move really isn't good enough.


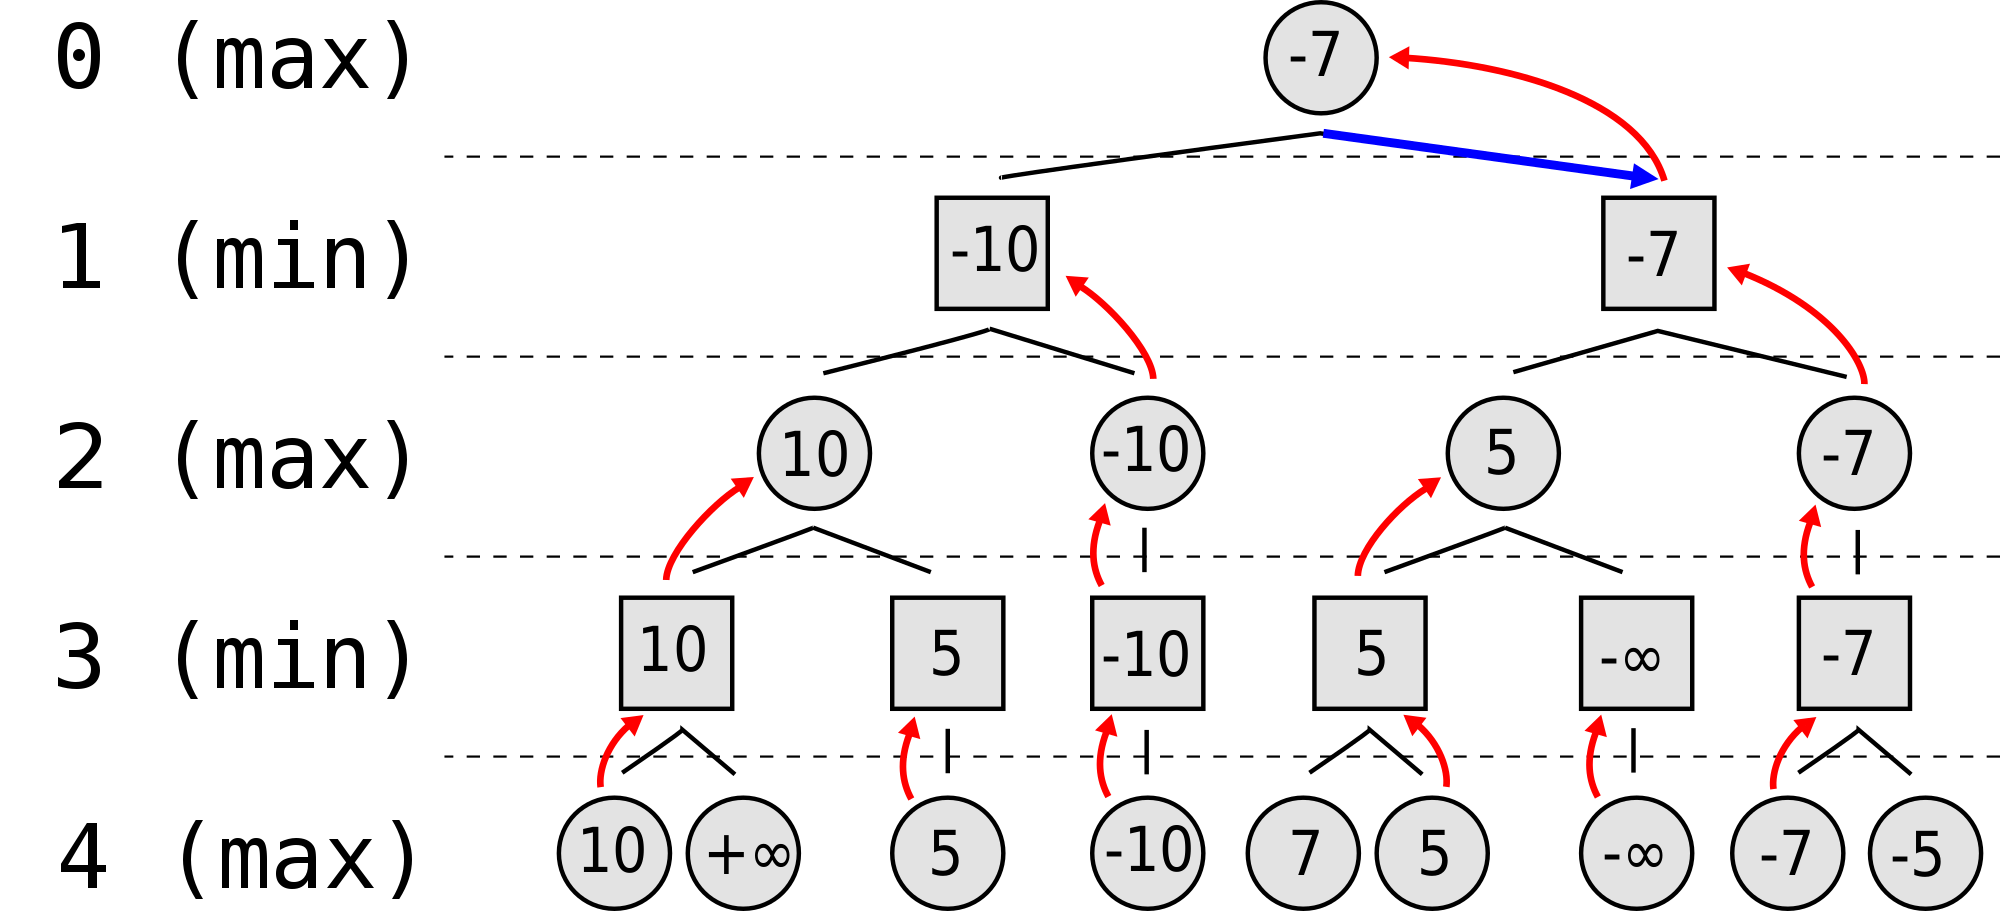
Minimaxing is a a method more specific to game theory. You assume that, for every move each player makes, they are going to try and maximize their own gains and minimize their own losses - while maximizing the losses and minimizing the gains for the opposing player. In true minimaxing, you estimate the number of moves it will take for you to win the game from a given state, and use that to assign the state a score. I combined this approach with a different heuristic to make my program as fast and effective as I could


 I actually built the first two iterations of this program back in mid-October, but I was then hit in quick succession with the Girl Scout National Convention and GSLI conference, my Gold Award Project, make-up work, then school, and it's just been crazy ever since.

The first draft took about a week to build.  I coded everything in Ruby.


Basically, the computer takes the tic tac toe board, uses is to test all the possible moves it can make, and picks the one that gets it the highest score. 

It played Tic Tac Toe, for sure! It just... didn't play very WELL. I used a heuristic that scored the board on the number of open rows, columns, and diagonals, but it just didn't give the weight needed to winning states. So I tried again.

I found a promising looking heuristic here. This one made use of an array to store all the possible ways to win, and another to score the state based on how many ways X and O can win on the board. But even better, I gave the computer the ability to look one move further ahead, and try to guess how the opponent would respond to its move.  This was minimaxing - the computer assumed the opposing player would play their best, and could then use its move to put the opponent in the worst possible position.

This program worked GREAT! It was almost unbeatable!

But, it had one weakness.


It could only look two moves ahead, and beating THIS trap required the program to look ahead 4.

In the end, I found it was easier to adjust my heuristic than to double up on the moves my program watched. I made sure it treated getting these traps - the three corners, or this triangle - as winning when scoring the boards, but NOT when checking for a win. In this way, the program finally worked.


Next, I'm working on trying to make a program that can learn the game on it's own from repeated trials - but that's a whole other ball game. For now, I'm just happy with how my first foray into AI programming worked out!

If you have questions/or comments don't hesitate to ask! I'm always happy for feedback.

Monday, January 5, 2015

More Web Design: Learning Rails Online

So, if you haven't seen my other post, as a part of the application process for a more advanced Tech Theatre class in 11th grade, I need to have a digital portfolio.*

Now technically I could just have my every project hard-coded into each page using html and CSS, but that sets off every alarm bell I've got. It's just bad code. I don't want to have to type all that out over and over again! It would be much easier if I could create and projects without having to program each one in individually.  So, I visited my good friend Codecademy again to take a crack at one of their newer, longer, tutorials: Ruby on Rails.


* I have since been informed that a powerpoint would have been fine, but where's the fun in that?

I picked Rails over PHP or the other options because I've had more experience coding in Ruby than any other language (except possibly Java, through iTunes U's Stanford CS101 course, but that was a while ago). I wanted at least some sort of base to start from because, and let me make this very clear: I had no clue what I was doing. I'd never done any sort of web applications before. I'd never done any programming projects where I had to juggle multiple files or languages. So I figured if I was going to take my trial by fire, I might as well wear some sturdy shoes.

I installed Rails through Homebrew (a package manager that mimics linux) for my mac. All the files I  created defaulted into Xcode and not Textmate, which surprised me, and then I used Brackets to edit my views and stylesheets.

So like this, but with at least seven more windows open, and a cat lying on the keyboard.


The rails tutorial has a very, VERY slow start, especially if you already know how to code in Ruby. It's essentially a Ruby and a Rails intro all in one, and I couldn't find any way to skip. Prepare to spend a good hour on 'hello world!' type lessons before getting to the good stuff. And the good stuff is good, but I had one major problem through the tutorial - some of the code doesn't translate well to building your own app because it leaves out bits to simplify the tutorial.  Which meant I saw an awful lot of this:

Add your own hair pulling and incomprehensible screeching.

And don't get me started on associations. For the basic structure of my web app, I want each project to belong to a category, and each picture to belong to a project. It turns out that Codecademy's take on explaining how to create these associations... assumes a lot, in the best of cases. In the worst, trying to replicate the code structure just doesn't work because they leave pieces out.

Sometimes though, it's your own fault and you know it.

So, I supplemented my learning with this Rails Guide. The great thing about this guide is that it can act as a sort of cheat sheet. Every time I looked at something in the codecademy tutorial  and had no clue what was going on, I could look back to this page, and find the no-fluff method to getting done what I want to do. In my opinion, it does a much better job of explaining the structure of Rails than Codecademy. But the benefit of Codecademy is being able to type in the code for yourself and see the different files side by side in the simulator. For better or for worse, I really needed both.


Of course, neither of these things stopped me from spending hours on stackoverflow because my CSS wasn't updating as I refreshed the page, or my migration wasn't taking, or every single one of my pictures was apparently owned by every single one of my projects. That's just part of the learning process: you can't really, truly learn a programming language until you start to program something in it.

So now my website is finally coming together functionally!


CSS could still use some work though.

 I've started to look at options for hosting. I'm going to try out Heroku, because it's free to start out, and I've heard good things about it so far. Any thoughts or suggestions? Questions about the tutorials, or where to learn more? Ask away!


Sunday, November 23, 2014

Trying out Web Design

So, as I posted here earlier, I'm planning on revamping this blog's appearance. This isn't a random burst of inspiration: this year, for my Technical Theatre class, we're required to create a digital portfolio. That's practically what I've been using the blog for so far, so, although I'm creating a separate website for the portfolio specifically, I'd like the two to have a unifying theme. Also, I may be using this blog to document my Gold Award project (which was approved yesterday! Expect the post to FINALLY make it up later this week.) I want it to look more professional, and, in general, more "me." So, here are the steps I've taken so far to try a whole new kind of coding.

Step One:  Learn how to code.


I'm going to be painfully honest here: prior to this project, I had never used HTML before. Never. Not once in my life. Not even a little. It's one of those things that would have been useful that I just never did. Thankfully, it's 2014 and the internet flourishes. I tried out a couple of different online tutorials, and by far the best one was the Codecademy: Make a Website tutorial, covering HTML and CSS. It's straightforward, it's fast (I did an hour here and there over a week and finished easily), and it's what I needed to know.

Even later, when I actually started coding, I could check the Codeacademy HTML and CSS glossaries, which made for handy cheat sheets, and had everything covered in the course, and more.

A word of warning though: The website recommends the javascript-based "Build an Interactive Website" tutorial immediately after the one I took. For that tutorial, you really do need to have a decent understanding of Javascript before you take the plunge. I left it pretty thoroughly confused after the first few problems.  I started the Javascript tutorial a few days ago, and it's pretty basic stuff, but I'm hoping when I finish I can take another stab at it.

Step Two: Get a good editor to work in.


For most of my day-to-day programming, I use Textmate. But I got a good recommendation from a friend as far as a good Wed-Design specific text editor: Brackets.
And I have to agree: Brackets is the best.

There are two things that make Brackets really useful:
One, it keeps all your files organized in the sidebar, where they're easily accessible without making you go dig through folders and directories. All of them. Pictures, HTML, CSS, add-on libraries. I'm not very organized on my own, so this was a LIFE CHANGING revelation, and the second most useful thing about the program.

Two, it comes with a way of previewing your website live as you make changes. It comes with the download, and you need Google Chrome to use it. But there was nothing better than being able to tap away on my keyboard and see the elements of the website come to life in front of me. It's not always perfect. I usually had to reload the page on chrome after any big changes. But it was helpful both in designing the page and understanding the code I was designing with.

Step Three: Start Designing!

I'm working specifically on the Portfolio website right now. I have a plan drawn out (which I'll upload once I redraw on something that isn't my English HW). Once I figured out how everything fit together , it was really fun to manipulate. I used Bootstrap to make the designing a little easier, which was super handy, and there's a lot of support out there for it. This was what I had at the end of the day:


The idea is to have each project organized on the timeline from most to least recent. Each one will be contained in a box with it's title, a short description, a picture, and a link to a page with more information. What's here isn't quite right either - I want the red timeline thinner, but that's a challenge for another day.

I think I want to try and use Rails to make adding and updating projects easier. I tried the Rails for Zombies tutorial a few months ago, but I never felt really comfortable with the material. I guess it's time to retry, maybe with the Codecademy tutorial as well? I figure that will be useful for a blog design too! At least I don't need anything solid to turn in until April.

So that's my Thanksgiving break plan. I'll also be working on my Makerspace plans (Look for a post! I promise!), school work (bleck), and an interesting proposal I got from my Tech Director about using robots to move set pieces for this year's musical (More on that later, I hope).  Not much of a break, but I'm just happy to have a few days I don't have to get up at 7 am if I don't want to. How about you guys? What are your plans?


Friday, August 8, 2014

Practice Project with Mindstorms


It turns out I prefer busy summers to boring summers, but I also tend to go a little overboard. So if this poor blog seems abandoned, that's because it is! But it's time to fix that.


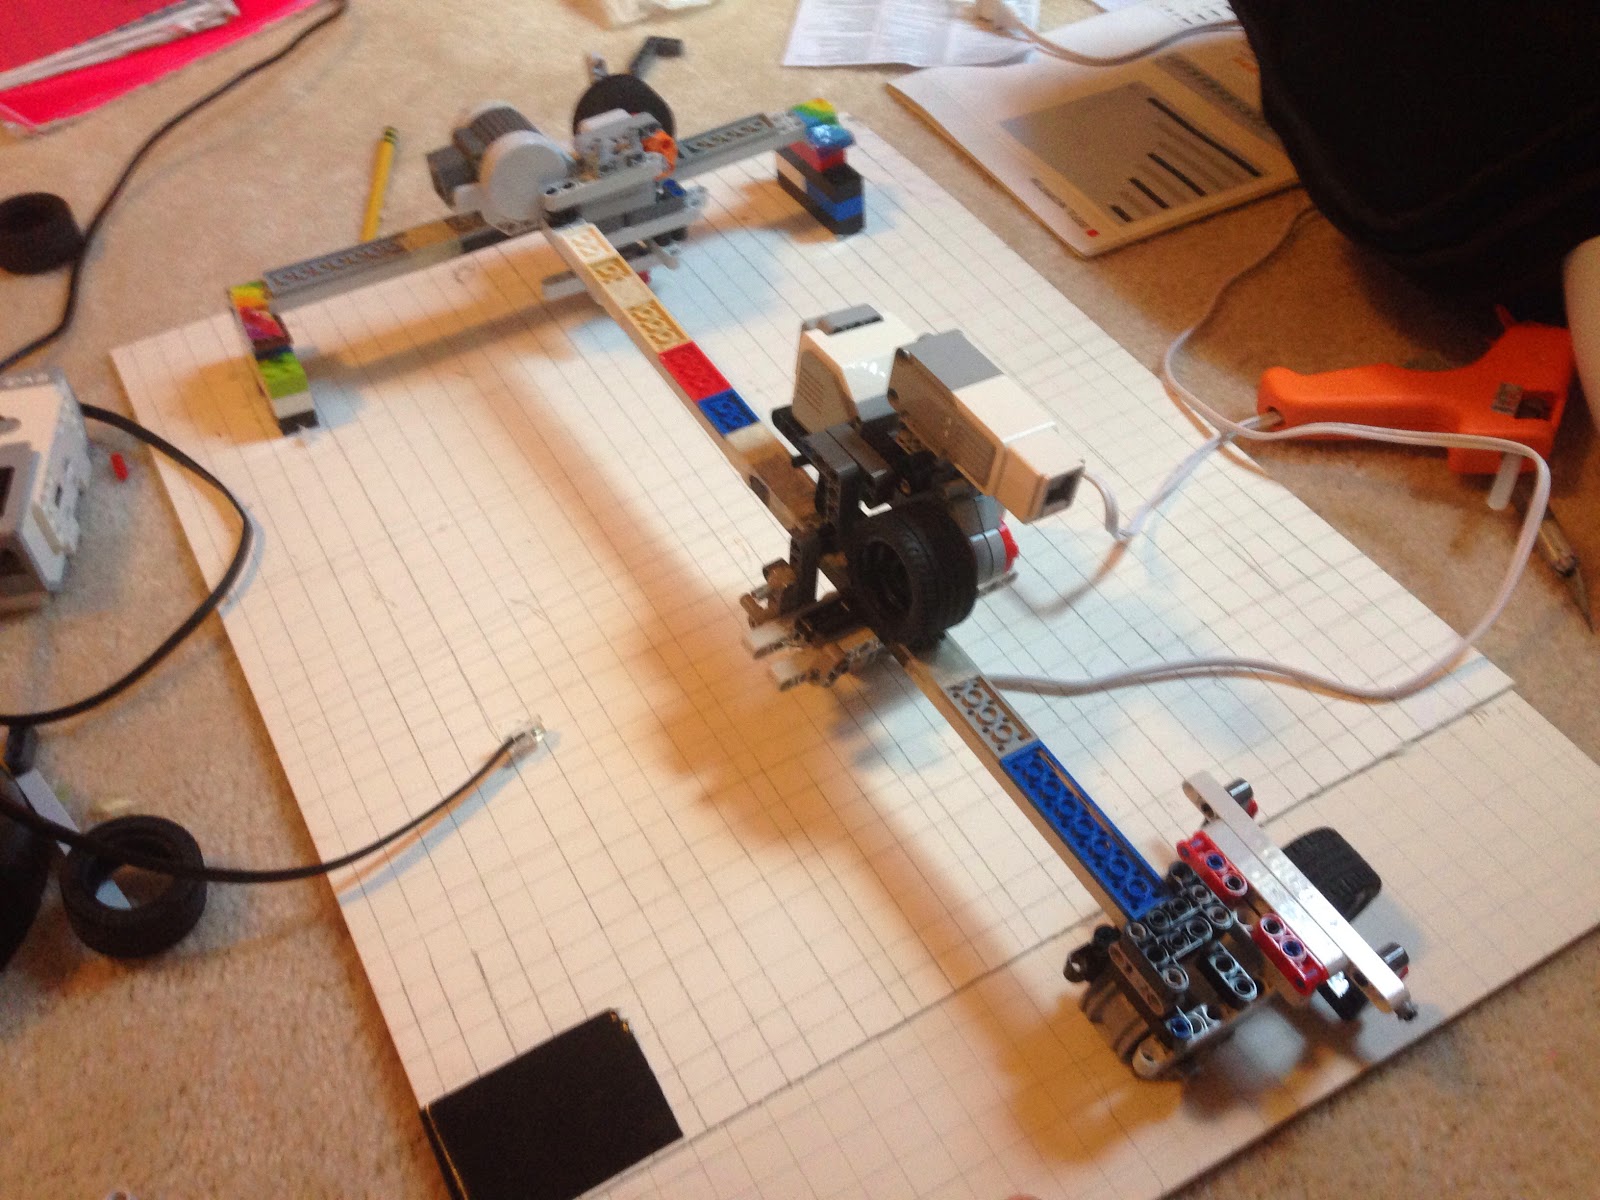
This project was supposed to be a  sort of automated set of drawers. A grid would sit over them, holding the drawers. The two motors could move to a certain "coordinate" to let the third lift the drawer. Overall, I was able to make it work well in concept. But I'm abandoning the project in its current form for now, just because the limitations of the Mindstorms kits and my own time and resources have made it difficult to complete.

I've noticed that the Mindstorms kits are optimized for compact robots. The pieces fit together with a fair amount of wiggle room, but if you aren't wedging anything inside that would allow them to move, you're fine. However, if you want to build a machine with a longer arm protruding from it, the leverage can cause connections to bend or even snap open. This made my plan of having one motor moving a bar holding the others difficult. As you can see in the video, the bar twists the motor holding and makes accurate movements difficult. 


Another difficulty I had was with the Mindstorms software. What I was looking for was a way to input a command from my computer that would trigger a method in the robot. While there is a Bluetooth connection option for the brick, it doesn't let me contact the brick with a command while the program is running, as there's no text input function. In the end I settled for inputting a "code" through the pressure sensor, so the robot would move to a position dependent on the number of times I pushed the button. This worked fairly well. This is the code I wrote that does just that.


The awesome people on the Google + Makers forum suggested I use MIT App Inventor, which lets any android device communicate with the brick through Bluetooth. This is a great idea! BUT, I regrettably have no android device on which to test this capability. I'll have to cross my fingers for my birthday. 

The video shows the last test I did of the robot. The design is... Not great, because I had to keep dropping and coming back to the project, and every time I would get halfway through fixing a problem, and have to stop for the next camp or class.
The robot did better in earlier tests, before the bars started rubbing the nubs away on the Legos holding them together! Great. And now that I'm trapped between eschool, drivers ed, and another super secret  project (coming soon!) that requires lots of time commitment, I decided to give this project a break. I'd like to come back to it at some point later, probably using an arduino and an upright set of drawers. I've got a few ideas written down. But for now, I'll just consider this project a good exercise in programming and design, and 
move on.
Up next: an upgrade to an old robot, a super secret project, and a book review to finish up the summer.

Tuesday, June 24, 2014

Finally set up my Raspberry Pi!

From this:


To this:


In just three hours of "why doesn't the pound key on my keyboard work?" "I commented out the overscan code, why won't it fill up the screen?" (Pro tip: the Raspberry Pi defaults to the Great Britain keyboard interpretation if you don't tell it otherwise, and use an hdmi cable if you want any control over your screen)

I got the pi for my birthday, but I want sure until recently what I wanted to do with it. I've decided I want to try combining it with my arduino hardware to automate the blinds, lights, etc. in my room. I can't really get going until I finish up with my month of summer camps though. Expect a theatre tech projects after next week, as soon as camp gets done and I can finally take a nap.

Saturday, June 7, 2014

Useless Lamp - Mindstorms EV3

For our final project in one of my classes, we had to create an art piece based on a movement we studied. I picked Dada, and this is my project, Lamp. Here's a video of it in action.


I built the project using two mindstorms large motors and a pressure sensor. There are two halves to the mechanism - the "useless box" half, and the half that controls the lamp. The lamp in particular I used had a wheel switch that I had to to try three different ways of operating, finally taking it apart and reworking it as a button. The box decorations are made of vinyl and fabric I had lying around the house. I'm only going to talk about the mechanisms involved in making your own useless lamp. The rest is up to you.


Friday, June 6, 2014

Feature Friday: An NSA Sarcasm Detector?

There's a number of reasons why using social media as a method of finding potential criminals is both ineffective and dangerous, but the NSA seems intent to try and do so anyway. I'm not here today to discuss the ridiculousness of monitoring huge quantities of junk data for a threatening tweet, or the terrifying potential repercussions for the person who makes one too many jokes about the security inspection at the airport. I want to talk about the NSA's search for a twitter sarcasm detector, and whether or not such a program is feasibly possible, and how effective it could ever really be at filtering joke threats from the real ones.

First, lets pull up a definition of sarcasm.

sar·casm

 noun \ˈsär-ËŒka-zÉ™m\
: the use of words that mean the opposite of what you really want to say especially in order to insult someone, to show irritation, or to be funny

It's understandable why the NSA would want to avoid lawsuits by filtering out everyone who didn't actually MEAN their threats. But, the difficulty with machines recognizing sarcasm comes in two parts: 

One, sarcasm relies on the context in which it is made.


This is an easy one. No one wants to have to wait for their food, right? We construe that as a negative thing. So, someone acting excited or happy about their food being late is being sarcastic. 

However, sometimes it can be more difficult. If I say "Wow, great new plan by the NSA," if you don't know specifically which plan I'm referring to, my opinion on or views previously expressed about the issue, or even what community or scenario I'm speaking in, you might have a very hard time telling whether or not I'm being sarcastic. Then tie in allusions I make to other situations or pieces of media that need the same amount of context to be understood. It's not looking GREAT for the NSA right now.

Two, many people like their sarcasm as subtle as possible.


Some trolls will a satirical account where they try and make as many people angry as possible through their content to get views. Meticulous troll sarcasm can be difficult even for human users to spot, but for machines, it can be downright impossible, as they wouldn't use #hashtags, italics, WAAAAYYY OVEREMPHASIZING, or other clues the more sarcasm sincere might present. Imagine Jonathan Swift's " A Modest Proposal." An important piece of satire, but how many HUMANS thought it was real when it came out? 

This isn't to say that a computer CAN'T find sarcasm on the internet, but it's harder than it might look at first glance. 


A couple of projects like What Does The Internet Think and SyFy's Twitter Popularity index have already attempted "mining the sentiments" of social media. As this awesome article states, it's complicated, and while SyFy doesn't have the authority to arrest people if its program goes wrong, that's not the case for high-stakes web-terrorist stakeouts. As seen above, going by sentiment mining alone, half of  internet users are neo-nazis. (Note: This demographic is only accurate for youtube commentators so far as I can tell. Sigh.) 

The NSA can sink its money into making a complex, brilliant program that searches phrases and hashtags and formatting, tracks the sentimental tweets of users and their internet searches to determine their views and opinions, connect media references to their sources and the context involved there, link accusations of trolling to offenders and evaluate their veracity. They could sponsor the creation of an incredibly intelligent machine, and that is why I've included their claims as my feature today. I want this program to be made. But I don't want it in the hands of the NSA. 

In Cory Doctorow's Little Brother, he discusses the potential implications of a world where your every move and search is tracked, and analyzed for threats. Even as the tracking technology of the government improved, there were still so many false positives and negatives. .01% of a billion is still a huge number of people being put on the blacklist. And people kept finding new ways to trick the system. If the NSA gets its sarcasm detector and even one threat is missed, even one comment misconstrued, the first protest will be from those who make their sarcasm more complicated, harder to detect. So the NSA makes a new program. It's a battle without a winner. 

So don't let the silliness of such a request fool you. It CAN be done, and it WILL be dangerous to the neutrality and safety of posting even stupid things on the internet. This battle hasn't come to a front yet, but if you're interested, there are other battles being waged right now. Start with this petition on net neutrality. And please, whatever sarcasm you choose to use, don't threaten violence where it could be misconstrued. If not for the NSA's peace of mind, then for mine, and the 7 billion other people on earth who might take you seriously and react accordingly. Stay free, internet, and I'll see you next week!


Saturday, May 31, 2014

Elements of Computing Systems: Chapter 4

This has not been a great week for me. This post was SUPPOSED to be a tutorial for making fluorescent lightbulbs run on batteries. The problem being, of course, that two months and entirely too much solder into the project, my lightbulb remains unlit. Sigh. So, instead I turned to finish Chapter Four, which describes the Hack machine language you'll be using in your computer. It only has two projects at its end, so I figure I can read through it quickly and finish before I start studying for finals.

This was before I realized that in Chapter Four, ECS throws all of its rational explanations and helpful examples out the window in exchange for a list of machine language commands whose functions remain a mystery after reading the chapter three times. I didn't actually finish this project on my own. I found solutions others had programmed and studied them in order to figure out what the code actually did. And this was after studying the Hack tutorial on the Nand2Tetris website and the forums. I'll do my best to explain my problems with the chapter, but considering I'm still not sure I understand it, the explanation may not be accurate.

The first issue I encountered was in their initial explanation of machine language. Their explanation uses syntax from some language other than Hack, which was very confusing.
Then they go on to their explanation of the machine's two memory registers: A, which holds information that can be used in a command as either an address or a value, and D, which only holds values. These registers are manipulated through an @ command. The @ command is not well explained at all. The book seems to say that it works like a pointer in the A register. Actually, it loads a value into the A register. Consider this code.

@R1             // This loads the word "R1" into some space in the A register
D = M           // M refers to whatever is currently loaded in the A register, in this case R1
                      // D is the D register, which is unaffected by @ commands, so it can store values that are
                      // used by multiple @ commands.
@x                // This loads the word "x" into some space in the A register
M = D           // In a higher level language, this would translate to x = R1.
                      // The program will now read R1 everywhere you type x

Some 'memory words' (a term not defined in the book, meaning "R1" or "SCREEN" if those point to a specific memory address.) appear to be predefined addresses, but these are never listed. One of the projects involves creating multiple loops, but the syntax for loop creation is never given. At one point the chapter detours to describe how C commands translate into binary, which is both useless for the project and intensely confusing. You have to clear each memory register before you use it, but are never told to do so. The list goes on and on.

I don't understand how others were able to create their projects from this chapter. I may have done an exceptionally terrible job with the reading and missed everything I needed to know. I've never used machine language before. I had no context for how it should work. After hours of study, I was able to recreate others' solutions for the projects, and I understand the language enough now to use it. But did it really have to be that difficult?

I'm also a bit concerned that there was no chapter where we created the Assembler and CPU (unless those are created in chapter 5 and we just skipped around a bit.) I understand that they may be too complicated for the course to include, I was just expecting to build the ENTIRE computer, not just the parts of it that were convenient.

Hopefully I'll find Chapter 5 easier to understand. It probably didn't help that it was the week before finals too, and every teacher assigned every project at once. The upside is, expect project posts soon! I've got two on mindstorms and one on tech theatre costumes as soon as they get back from the school.

Then it's on to summer! And summer means robots and space camp, so you know what? Chapter Four? Still worth it for getting me that much closer to having my computer BUILT.

See you next time!


Sunday, May 11, 2014

The Elements of Computing Systems, Chapter 3

Finished Chapter 3, all about memory and sequential computer chips. This chapter was generally easier than chapter 2 in my opinion, mostly because all except for one of the chips were just bigger, badder versions of others. Making RAM4k isn't any fundamentally different from making RAM512, so you can't breeze through each of those chips easily. Which is good, because the outlier chip, the counter, was the most difficult chip I found to implement so far.
Unlike the ALU, where my problems were born of my own poor decision making skills, the sequential chips are just more difficult to design. They require a different kind of thinking than the combinatorial chips, because you have to account for past values emitted by the chip and compare them to the value the chip is receiving now. Be ready to make good use of your multiplexers.

The counter itself is particularly difficult for two reasons. One, unless you take the time to look at the test and the .cmp files for the counter, it can be difficult to understand the structure you're aiming for in the chip. Two, the structure itself is complicated, and relies heavily on the order of the gates. I used the debugging flag tool in the software for the first time for the counter, and I was very happy with how it worked, considering I did a LOT of debugging over the course of the chip. If you have trouble, remember its called a sequential chip for a reason. Figure out the order things should be calculated first, then go from there.

  1. Also, the tests for the memory related chips can take forever to complete. If you aren't specifically debugging a certain section of the program, run the test with no animation, otherwise you may be sitting there for ten minutes.

Monday, May 5, 2014

Elements of Computing Systems, Chapter 2

Chapter Two took me significantly longer to finish than chapter one, but mostly because I decided to get cheeky with the software. Just because you can do something doesn't necessarily mean you should in the interest of efficiency or mental health preservation.

The second chapter focuses on translating the gates you've already made into the manipulation of binary numbers. As your project you build Adders, and Incrementers, and finally, your computer's Arithmetic Logic Unit, a chip for doing simple mathematical calculations using two 16 bit binary inputs.

This section's background information is shorter than the last, but before you start the projects at the end of the chapter, I highly, highly HIGHLY recommend that you read the entire appendix, telling you all about the software and the programming language. Read it through. Read it twice. Learn  how to use the software and the language , because when it comes time to use the ALU, it can be hard to distinguish between which problems are caused by syntax and which are caused by misunderstanding the concepts.

Like I mentioned before, while working on the ALU I got a little cocky, and decided to start designing my own chips and tests to deconstruct the problem. Two hours of hair pulling later, I find out the book has a section devoted to designing tests (although it specifies that a students really shouldn't need to do so in their projects). I discovered that my problem had to do with typing the wrong number of spaces in my .cmp file. Other fun problems included: linking the ALU's OUT pins to  an component chip, making an internal pin with a value of zero, and figuring out the difference between negating a binary number and making a binary number negative. These were all problems that could have easily been avoided had I read the appendix before starting the programming. Still, I feel that much more accomplished.

Another good resource is the forum. It's still very active, and there are plenty of people there willing to help with problems. They have a strict policy of not outright stating an answer, which I think is great, but I did notice that could sometimes leave the questioner be guzzled if someone was withholding information that would make it 'too easy.' So it shouldn't be your only resource, but I am 100% pro internet collaboration, and it appears to work well for this project. I'll be sure to set up an account for chapter 3.

With my ALU finally functional and a lot more HDL know-how under my belt, I'm ready to press forward and onward in the world of binary logic. Chapter 3 awaits!

Sunday, April 27, 2014

The Elements of Computing Systems, Chapter One

As a programmer and a maker, I think it's important to understand how computers work on all levels. I'm incredibly jealous of people who can build computers in games like Little Big Planet or Minecraft, because it's something I'd love to learn how to do. My dad showed me this book, and we decided to work through it together.

Even though you might worry that the information might be a little dated, coming all the way from 2005, the information is fundamental in a way that hasn't changed yet. Each chapter is divided up into various sections that will give you background information you need to complete the 'project' at the end of each chapter. The end result is using a chip design software that comes bundled with the book to build your own computer and use a higher-level language to program a game on it.

The first chapter introduces logic gates. I cannot stress enough how useful the background information is. As someone whose only experience with logic gates has been basic redstone built circuits in mine craft a year ago, and who's only taken programming courses through week long camps or online that don't delve into hardware at all, the information was invaluable.  It was easy to read, although I'd recommend having wikipedia ready to clear up any misunderstandings if you aren't familiar with some of the terminology.

The chapter ends by asking you to design each of the basic chips it mentioned (AND, OR, XOR, etc.) in the bundled software design program using only NAND gates. It gives you a short hint as to making each one, which pretty much boils down to HINT: READ THE BACKGROUND INFORMATION ALREADY.  Using the design program is simple enough. Each chip you have to design comes with three files: .hdl, the actual chip, .tst, the test script for that chip, and .cmp, the logic table the test script uses to test the chip. The test and logic table scripts come premade, but you have to drag the .hdl file to Textmate, or whatever you use, to program in the chip using their Hardware Development Language. It's very simple to learn, especially if you're used to programming.

Here's the kicker: Once you've programmed and tested a chip, if it works, you can use it in building other chips. For example, if you've successfully made your AND chip, you can use it directly in your OR chip instead of having to use two NANDs all over again. It gives you a feeling of building up your computer that's very satisfying.

Bonus: If you just aren't getting it with the programming language, you can always build a bunch of nand gates in mine craft and go from there.

I certainly liked this course enough to move on to chapter two. It does a great job of teaching, and even if the projects can be difficult, the give me a sense of accomplishment and understanding. But if you don't know anything about programming, try a programming 101 course first. It will help you have an easier time with the terminology and the design software when you get into the real meat of things