Showing posts with label Tech Theatre. Show all posts

Monday, January 5, 2015

More Web Design: Learning Rails Online

So, if you haven't seen my other post, as a part of the application process for a more advanced Tech Theatre class in 11th grade, I need to have a digital portfolio.*

Now technically I could just have my every project hard-coded into each page using html and CSS, but that sets off every alarm bell I've got. It's just bad code. I don't want to have to type all that out over and over again! It would be much easier if I could create and projects without having to program each one in individually.  So, I visited my good friend Codecademy again to take a crack at one of their newer, longer, tutorials: Ruby on Rails.


* I have since been informed that a powerpoint would have been fine, but where's the fun in that?

I picked Rails over PHP or the other options because I've had more experience coding in Ruby than any other language (except possibly Java, through iTunes U's Stanford CS101 course, but that was a while ago). I wanted at least some sort of base to start from because, and let me make this very clear: I had no clue what I was doing. I'd never done any sort of web applications before. I'd never done any programming projects where I had to juggle multiple files or languages. So I figured if I was going to take my trial by fire, I might as well wear some sturdy shoes.

I installed Rails through Homebrew (a package manager that mimics linux) for my mac. All the files I  created defaulted into Xcode and not Textmate, which surprised me, and then I used Brackets to edit my views and stylesheets.

So like this, but with at least seven more windows open, and a cat lying on the keyboard.


The rails tutorial has a very, VERY slow start, especially if you already know how to code in Ruby. It's essentially a Ruby and a Rails intro all in one, and I couldn't find any way to skip. Prepare to spend a good hour on 'hello world!' type lessons before getting to the good stuff. And the good stuff is good, but I had one major problem through the tutorial - some of the code doesn't translate well to building your own app because it leaves out bits to simplify the tutorial.  Which meant I saw an awful lot of this:

Add your own hair pulling and incomprehensible screeching.

And don't get me started on associations. For the basic structure of my web app, I want each project to belong to a category, and each picture to belong to a project. It turns out that Codecademy's take on explaining how to create these associations... assumes a lot, in the best of cases. In the worst, trying to replicate the code structure just doesn't work because they leave pieces out.

Sometimes though, it's your own fault and you know it.

So, I supplemented my learning with this Rails Guide. The great thing about this guide is that it can act as a sort of cheat sheet. Every time I looked at something in the codecademy tutorial  and had no clue what was going on, I could look back to this page, and find the no-fluff method to getting done what I want to do. In my opinion, it does a much better job of explaining the structure of Rails than Codecademy. But the benefit of Codecademy is being able to type in the code for yourself and see the different files side by side in the simulator. For better or for worse, I really needed both.


Of course, neither of these things stopped me from spending hours on stackoverflow because my CSS wasn't updating as I refreshed the page, or my migration wasn't taking, or every single one of my pictures was apparently owned by every single one of my projects. That's just part of the learning process: you can't really, truly learn a programming language until you start to program something in it.

So now my website is finally coming together functionally!


CSS could still use some work though.

 I've started to look at options for hosting. I'm going to try out Heroku, because it's free to start out, and I've heard good things about it so far. Any thoughts or suggestions? Questions about the tutorials, or where to learn more? Ask away!


Sunday, November 23, 2014

Trying out Web Design

So, as I posted here earlier, I'm planning on revamping this blog's appearance. This isn't a random burst of inspiration: this year, for my Technical Theatre class, we're required to create a digital portfolio. That's practically what I've been using the blog for so far, so, although I'm creating a separate website for the portfolio specifically, I'd like the two to have a unifying theme. Also, I may be using this blog to document my Gold Award project (which was approved yesterday! Expect the post to FINALLY make it up later this week.) I want it to look more professional, and, in general, more "me." So, here are the steps I've taken so far to try a whole new kind of coding.

Step One:  Learn how to code.


I'm going to be painfully honest here: prior to this project, I had never used HTML before. Never. Not once in my life. Not even a little. It's one of those things that would have been useful that I just never did. Thankfully, it's 2014 and the internet flourishes. I tried out a couple of different online tutorials, and by far the best one was the Codecademy: Make a Website tutorial, covering HTML and CSS. It's straightforward, it's fast (I did an hour here and there over a week and finished easily), and it's what I needed to know.

Even later, when I actually started coding, I could check the Codeacademy HTML and CSS glossaries, which made for handy cheat sheets, and had everything covered in the course, and more.

A word of warning though: The website recommends the javascript-based "Build an Interactive Website" tutorial immediately after the one I took. For that tutorial, you really do need to have a decent understanding of Javascript before you take the plunge. I left it pretty thoroughly confused after the first few problems.  I started the Javascript tutorial a few days ago, and it's pretty basic stuff, but I'm hoping when I finish I can take another stab at it.

Step Two: Get a good editor to work in.


For most of my day-to-day programming, I use Textmate. But I got a good recommendation from a friend as far as a good Wed-Design specific text editor: Brackets.
And I have to agree: Brackets is the best.

There are two things that make Brackets really useful:
One, it keeps all your files organized in the sidebar, where they're easily accessible without making you go dig through folders and directories. All of them. Pictures, HTML, CSS, add-on libraries. I'm not very organized on my own, so this was a LIFE CHANGING revelation, and the second most useful thing about the program.

Two, it comes with a way of previewing your website live as you make changes. It comes with the download, and you need Google Chrome to use it. But there was nothing better than being able to tap away on my keyboard and see the elements of the website come to life in front of me. It's not always perfect. I usually had to reload the page on chrome after any big changes. But it was helpful both in designing the page and understanding the code I was designing with.

Step Three: Start Designing!

I'm working specifically on the Portfolio website right now. I have a plan drawn out (which I'll upload once I redraw on something that isn't my English HW). Once I figured out how everything fit together , it was really fun to manipulate. I used Bootstrap to make the designing a little easier, which was super handy, and there's a lot of support out there for it. This was what I had at the end of the day:


The idea is to have each project organized on the timeline from most to least recent. Each one will be contained in a box with it's title, a short description, a picture, and a link to a page with more information. What's here isn't quite right either - I want the red timeline thinner, but that's a challenge for another day.

I think I want to try and use Rails to make adding and updating projects easier. I tried the Rails for Zombies tutorial a few months ago, but I never felt really comfortable with the material. I guess it's time to retry, maybe with the Codecademy tutorial as well? I figure that will be useful for a blog design too! At least I don't need anything solid to turn in until April.

So that's my Thanksgiving break plan. I'll also be working on my Makerspace plans (Look for a post! I promise!), school work (bleck), and an interesting proposal I got from my Tech Director about using robots to move set pieces for this year's musical (More on that later, I hope).  Not much of a break, but I'm just happy to have a few days I don't have to get up at 7 am if I don't want to. How about you guys? What are your plans?


Sunday, September 21, 2014

The Theatre Tech Magnetic Survival Bracelet

I'm a sucker for simple solutions for even the most superficial problems, so when I saw this magnetic bracelet for holding screws and nails during projects, I was sold from the start. But I needed something before I had to go work at the Children's theatre the next night (summer jobs, guys). Plus, that bracelet looked heavy, slippery, and easily scratched up. So I made a quick raid through my craft box, and ended up with The Theatre Tech's Paracord Survival Bracelet.


Pretty sweet, right? And it's magnetic enough to hold even 3in  screws in place while you walk around. 


Here's what you'll need:

Paracord (Measure around your wrist in inches, taking into account the fit you want, and, for this project, add an inch. Cut a foot of paracord for each inch. Ex. If your wrist was 8 in in diameter, you should cut 9 feet of paracord) Pick a color that makes you happy!


A Side Release Buckle (Mine was cut off an old backpack, wider is better for this project)

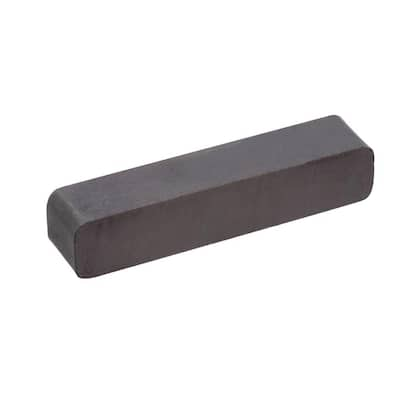
8-10 STRONG Bar Magnets, about an inch long each.
And your tools:

Hot glue (optional, but recommended)

A pair of scissors

A lighter or match

Measuring tape or ribbon

Start your bracelet like you would any other paracord bracelet, with two big exceptions:
1. Remember, when you measure your wrist, before you start cutting your paracord, add one inch. This will give you enough material in the bracelet to cover the magnets, and still have it fit around your wrist.
2. Lay your paracord flat on the table, instead of suspending it. This will make adding the magnets infinitely easier.
Stop once you have tied the first knot of Step 3 of this tutorial, or, if you're a paracord veteran who doesn't need it, once you've tied the first know between the buckles.
 Here's the tutorial I used: https://www.operationgratitude.com/wp-content/uploads/2011/04/HowtoMakeaParacordSurvivalBracelet.pdf

Once you've got it started, take your first bar magnet. You want to push it between the two strings in the center of your bracelet that you're tying knots around. You can hot glue it in place, if that makes it easier to hold. Then, continue knots over both strings and the magnet. The strings should end up on either side of the bar magnet, with the knots holding the whole thing together.


When it looks like you've only got one knot left on a magnet, slide in the next magnet right below it, and keep tying. Don't worry if you run out of space for magnets. Just continue tying over the string until you reach the end, then finish like any other paracord bracelet.

If you want, you can also add a magnet to back of the buckle like I did, but, at least for me, it was more of a hindrance than a help. The paracord keeps the magnets from getting scratched, but it's not thick enough to negate the magnetic effect. It's heavy, but not too heavy. And it's definitely been helpful for keeping screws on hand when I need them, while not letting me take them home in my pocket. It's definitely an accessory I'll keep on wrist when I need it.

Tuesday, June 24, 2014

Tech Theatre Camp 2014!


Finally, my summer begins! I've spent the past two weeks at three different camps, so my schedule was a little busy. This last week, I worked with 84 other students (20-something other technicians) for eight days, 9:00 to 6:00, to put on four one-act plays with full sets, sound, and lighting. It was understandably pretty brutal, but a great experience overall, and I got to work with a lot of awesome people making some really awesome things.

The show I was assigned to, although I worked on all the sets and helped out with every show, was a cut version of Urinetown, a silly musical we turned into a 40 minute play. I was specifically assigned to be the lighting technician.

The first thing we did at camp was a tutorial on google sketchup, which we were supposed to use to make a preliminary set design to present to our show's director. I've used sketchup for projects before, so it wasn't a big deal. I don't have the design for Urinetown on my computer, but my theatre teacher, the head technical director at camp, had me start designing sets for next year's shows while I was there. Here's a rough idea for Gossamer's giant door, for our first show, that I made in the class.


Next we started actually designing and building for our show. Urinetown had the most complicated set and lighting out of all the shows, and the director had some very specific ideas about the set, so we didn't do much in the way of "design" so much as "build and hope the director likes it."


The base of the set was some stacked "metal scenic pieces" (we weren't allowed by the district to use scaffolding in the set, but some rules were meant to be bent) 


The tech director wanted to have two 8' by 8' doors hinged to the legs of the inner platform that we could swing to either side to represent different locations in the show, but the director thought it would cover too much of the scaffolding. I suggested hinging two 4' by 8' flats to the outside platforms so they would close and open easily. The idea made it into the set.


This was the Tech director's idea, and I ended up building it. The school we were working at had some jail blocks left over from "Chicago". We stacked them on top of one another, and spray painted plastic sheets to stretch behind them. The whole thing was backlit by a source 4, so that when a character gets pushed off the scaffolding and is harnessed, he falls behind it and you see his silhouette. It looked really cool onstage.


The director wanted the secret hideout sign to be really, really obvious. We cut out the arrows and the sign, painted them, and then strung lightbulbs  across them. For each lightbulb I used a tomato corer (which is a real life kitchen implement??) to poke a hole in the foam, pushed the base of the light through it, and screwed the lightbulb in.
I don't have any pictures of it all lit up yet, or any of the lighting work I did for the show, because by then I was too busy to take the pictures. There was a staff member who was the designated historian, who took a LOT of pictures, but I doubt I'll get them until I get back to school. I promise I'll post them as soon as I get them though.


This is the most 'complete' picture I have of the set. The final version had a wall that flew in underneath the secret hideout sign, and the swinging doors were painted. 

I was excited to try lighting, because it was something I'd never had the chance to try at school. I gave my stage manager a heart attack because I didn't know how to write down cues, and I was pulled away from paper tech to make the 'moon' for another show ( which turned out to be a three hour ordeal in hand sewing that ultimately was cut ) and again to reupholster chairs (the reason I didn't know how to write cues was that this happens A LOT even at school) 

In the end the show went great. The only major hiccups were that a rig that made it rain on the top of the scaffolding broke halfway through the show and started spraying water backstage. I panicked and missed a cue, but once it was fixed, the show ran perfectly. The actors were amazing, my team did really well, the audience loved it, and, at the awards ceremony after the show...


I was one of 8 technicians to win an Exemplary Tech award, and the only student to win both that and the Callback scholarship, awarded to one technician and one actor, which means I get a full ride to next year's camp. (You can see me holding the certificate and gold 'C' onstage, which I thought was a horseshoe throughout most of the ceremony and treated it as such.)

And I definitely want to go back next year! I loved the jobs, loved the people, and as busy as I was, I was having fun the entire time. 


Sunday, April 13, 2014

Project: Set Design for Beauty and the Beast

I had a pretty impressive delay on starting this blog, and you can blame a fair mixture of social anxiety and high school theatre tech for that. My school doesn't have a whole lot of project based classes in it, but I go crazy if I spend all day doing reading assignments, so BAM, theatre crew.

This turned out to be a great choice for my mental health, but not so much for my free time.
I worked two shows (for a later post!) as well as taking the class. The director had decided that for our final show, we were gonna go with Beauty and the Beast. The Disney version. The Full version.

I was picked as one of eleven crew heads out of twenty-something crew, at which point I realized what I had gotten myself into.

Here's a rundown of what's taken over my last three months.

1. The Beast's Chair


For some reason I don't have a picture of it upholstered, but this was my first project for the musical. Me and two of my classmates were given some pictures of armchairs from other productions, and told to design and make our own. The chair itself is about 3ft. wide and 6.5ft tall, pretty fricking heavy, mostly because of the back. It's name is Dylan. See our selfie below.
The theatre director claimed it as her 'throne' in the scene shop. 

2. The Spiral Staircase


My next big project started when the tech director learned that I was in a higher level math class. I walked into the classroom and was immediately told "we need to build a spiral staircase, but it needs to start out being 6 feet wide and taper to 4 feet wide, go from *here* to *here* and curve like *this*." I didn't actually help much with the building of this, but the design was all mine.

3. The Rooftops


By the end, I designed and built three roofs for the show, two for Belle's house, and one for another building that served a number of purposes.  They looked very asymmetrical and cartoony, which was great for the audience, but meant we had to have three people to build each one, and even then they sometimes had to be rebuilt. Not to mention, they were heavy enough that we had to tie them to a batten and fly them to get them on the houses. 

4. Foam proscenium… thing?


I don't know why we had to have this particular flourish, and it was definitely my least favorite project of the show, just because it was so picky as far as measurements go so that it could be symmetrical. I designed and cut the pieces for the two layer frame for the proscenium arch. (At one point I had to recut something because it wasn't 'wavy' enough) The effect is cool, but that was a week of high blood pressure I could have lived without.

5. Maurice's Invention


I enjoy working with projects that have moving parts and electric components, so this was my main project throughout the production. It's named Ada, after Ada Lovelace, the first computer programmer. What I'm most proud of in this project is that nothing had to be purchased for it. Everything on the invention came from the scene shop or from set pieces from previous shows. Even the wheel attached to the axe came from our second bicycle (which was apparently in three pieces.)

I designed the invention, presented my design to the tech director, and then I worked with an assistant to build the thing. The box on the back held the 'log' to be chopped, and the top was attached by a hinge so Maurice could get to it. The actually chopping motion was supposed to be controlled by a plain DC motor, but the tech director couldn't get one. I ended up ghetto rigging a drill during hell week to turn the belt of the bike wheel and spin a pole attached to the bike wheel and the axe head, while the axe handle was bolted to the invention, which created a second-class lever and a pretty forceful chopping motion. This worked at every rehearsal, until opening night, of course. The Tech Director and I reworked it, and it worked perfectly every other night. 

The whole thing is long and heavy, and somehow (barely) rideable. It chops cardboard logs with gusto. It makes me prouder every day. Yay Ada!

5. The Castle

The castle was designed by the directors, but all crew helped build it, and it's really awesome to see it painted and everything, in it's entirety. It's all on casters (we had to push it forward during 'be our guest' as a special effect), and the west wing, stage left, is hollow underneath with an access door on the back. This was so that four of the crew could push it forward and spin it right before the beast's first solo song and show the balcony. It was an awesome show to work on, and apparently to see, as by the second night it was SRO. The actors did amazingly well, and I had so much fun working on it. Now just to wait for next year!